
Do you know how to screenshot on MacBook Air? Screenshots are convenient when you have to share a quick report or share any details. In this blog, let’s understand how to screenshot on MacBook Air.
Top 3 Ways To Screenshot On Macbook Air
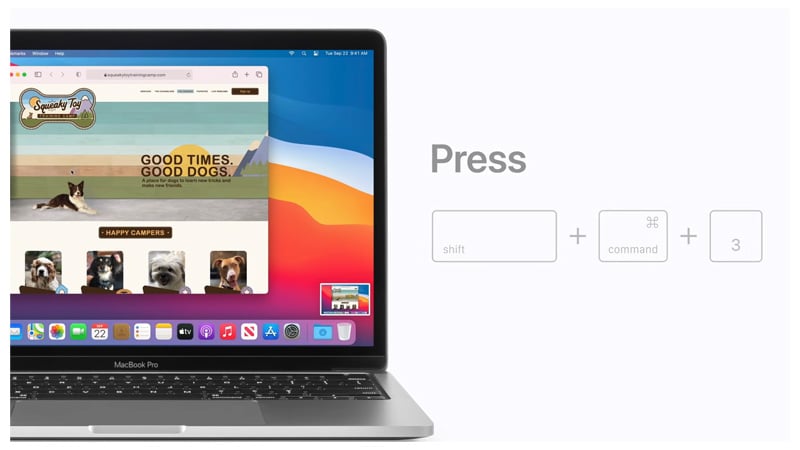
How To Take A Screenshot on MacBook Air?
- You need to press and hold these Shift, Command, and 3 together to take a screenshot.
![how to take a screenshot on macbook air]()
- Also, You will see a thumbnail in the corner of your screen; you need to click it to edit the screenshot. Or you have to wait for the screenshot to save to your desktop. Isn’t it easy how to take a screenshot on MacBook air?
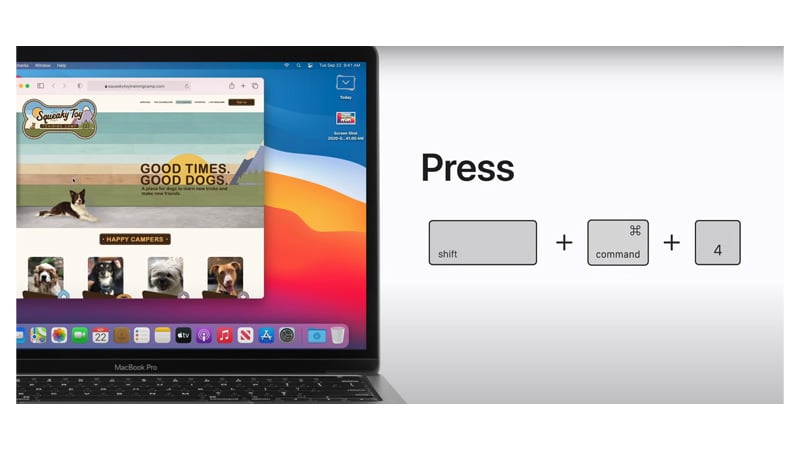
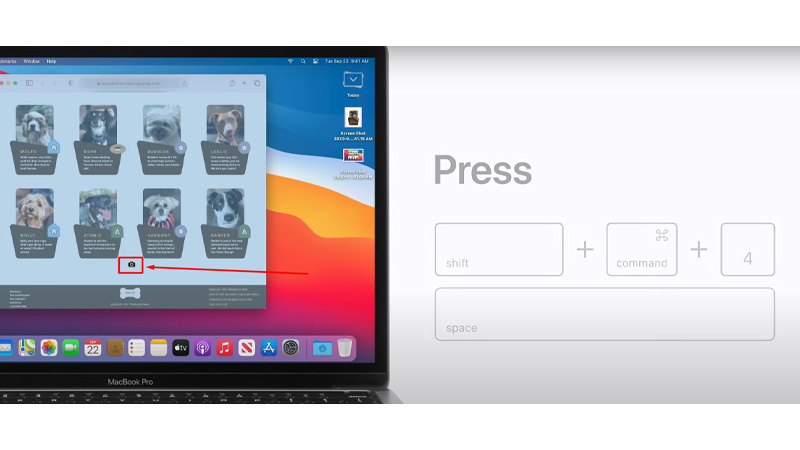
How To Print Screen On MacBook Air To Capture a Portion?
- Press and hold these keys together Shift, Command, 4, and Space bar together.
![how to print screen on macbook air]()
- To select the area of the screen you want to capture, drag the crosshair. You need to press and hold the Space bar while dragging to move the selection. If you don’t want to take the screenshot, press the Esc key.
- To take the screenshot, you have to release your mouse.
- There will be a thumbnail in the corner of your screen, click on it to if you wish to edit the screenshot. If you don’t want to edit the screenshot you have taken, you need to wait for the screenshot to save to your desktop. Isn’t it easy to learn how to print screen on MacBook Air.
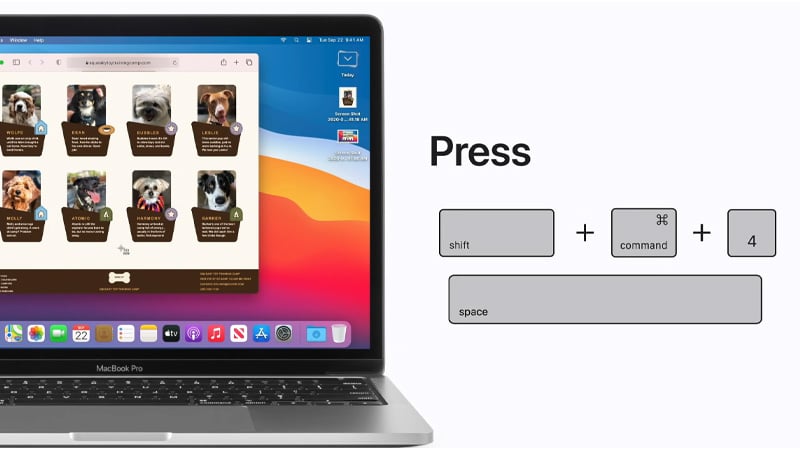
How To Capture A Window Or Menu On MacBook Air?
- Open the menu or window that you want to capture.
- Press and hold these keys together Shift, Command, 4, and Space bar together.
![capture on macbook air]()
- The pointer will change to a camera icon. If you want to do not want to take a screenshot, then press the Esc key.
![screenshot of macbook air screen]()
- Click the window or menu to capture it. If you want to exclude the window’s shadow from the screenshot, press and hold the Option key while you click.
- There will be a thumbnail in the corner of your screen, click on it to if you wish to edit the screenshot. If you do not want to edit the screenshot, wait for the screenshot to save to your desktop.
Conclusion
We all know how important it is to learn to take a screenshot. Now that you know how important it is to take a screenshot on MacBook Air, you can go ahead and take screenshots to share them. Learn about the Apple TV features in our guide.
Frequently Asked Questions
Q1. How do I take a screenshot of my MacBook Air screen?
- Press and hold Shift, Command, and 4 together.
- You need to drag the crosshair to select the screen area to capture.
- To take the screenshot, you got to release your mouse.
There will be a thumbnail in the corner of your screen, click on it to if you wish to edit the screenshot.
Q2. Why can’t I take a screenshot on my MacBook Air?
If the screenshot feature on your Mac isn’t working, shut down the Mac and turn it on again.
Q3. How do I enable screenshots on my Mac?
Choose Apple menu > System Preference on your Macs, click Security & Privacy, then click Privacy. Select Screen Recording. You need to select the checkbox next to an app to allow it to record your screen.
Q4. Why does my screenshot not work?
Storage may be in use,” or “Can’t take screenshot due to limited storage space,” reboot the device. If this doesn’t work, try a disk cleanup app or move your files to cloud storage or an SD card. Or finally, you can try a factory reset on the phone. This step will erase your data.